Childhood Adenotonsillectomy Trial
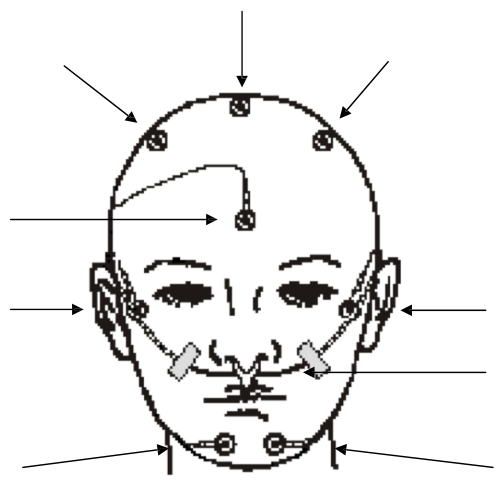
6.5.10 Suggested Order of PSG Hook-up
Leg EMG electrodes (2 snap or gold disk electrode on each leg) Below the knee on the outside of the upper shin (lateral aspect) on the belly of the tibialis anterior muscle, 2 electrodes on each leg at least 3 cm apart. Place 2 electrodes on each leg. Run electrode wires upwards over clothing after attaching electrode to the leg.
ECG (3 snap or gold disk electrodes) ECG 1 below right clavicle. ECG2 below the left clavicle. ECG 3 on left lower ribs, below nipple.
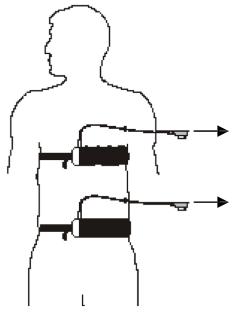
Respiratory belts (2) Thoracic belt below armpits and above the nipple line. Abdominal belt at or slightly above the “belly button”. When placing respiratory bands observe the participant’s breathing normally to determine proper positioning. Attach SUM module to the appropriate jack box pin positions.
Gold Disk Electrodes Head: REF (FPz), GND (post Cz), C3, C4, F3, F4, T3, T4, M1, M2,O1, O2, E1, E2, Lchin, Rchin, Cchin
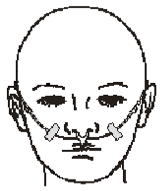
Thermistor + Nasal Cannula Between nose and upper lip. Place the Dymedix sensor before placing the nasal cannula. Correct placement of the cannula is along the floor of the nares (inside of nostrils), tubing should be looped behind the ears and the bolo slide on the tubing moved to beneath the chin. Tape the wires of the airflow sensor and the cannula lightly to the sides of the face to maintain placement.
Oximeter On a finger (preferably not index) of non-dominant hand. It is best to use digits 3 or 4, as these are the best perfused. Place the sensor so the light diode is directly in line with the sensor; if misaligned there is a risk of inaccurate saturation values.
Position Sensor Velcro square at middle and top of thoracic respiratory band. Check and validate function of sensor before placing.
Leg Sensors
Using adhesive patient tape attach 2 electrodes over the bulk of the tibialis anterior muscle on the left and right leg, where the greatest muscle movement occurs. Electrodes should be at least 3 cm apart. Provide stress loops at the electrode wires. Electrode wires may be drawn upwards and taped again to the outside of the pajama legs to avoid participant tripping when ambulating.

Respiratory Belts
The abdominal band should be placed on or just above the umbilicus with the lead wire facing upwards. Adjust the belt so the belt is secure, but not tight.
Place the thoracic band between the armpit and nipple line, with the lead wire facing upwards. Adjust the extender belt so the belt is secure, but not tight.
After placing the thoracic belt attach the Z-rip Sum box to the Velcro holder. Plug the belt wires into the correct receptacle of the Z-rip box.
Incorrect application of respiratory bands can cause very poor signals. Do not restrict the subject’s comfort or breathing.
ECG Electrodes
ECG1 is placed 3-5 cm.(2 finger breadths) below midpoint of right clavicle. ECG2 is placed 3-5 cm below the left clavicle and serves as a redundant (backup) electrode. ECG3 is below the left ribcage.
1) Prepare the marked sites by lightly abrading with prep gel. Remove excess prep gel before placing the electrode. Remove backing from electrode and place gel electrode on cleansed sites, with gel side down.
2) If using snap electrodes, snap electrode to lead wire before applying to subject’s skin, unless you have offset snaps.
3) Form a small "stress" loop with the wire immediately feeding the electrode, secure with a small amount of tape.

EEG Scalp Electrodes (Gold Disk)
Depending on the preference of the PSG laboratory the gold disk electrodes may be applied to the prepared sites with collodion or an electrolyte paste. Collodion application requires an additional electrolyte between the cup and skin. EEG paste serves a dual purpose: providing both a conductive pathway for the signal to enter the electrode cup, as well as holding the electrode in place on the skin. There are different electrolyte pastes available, as well as different application techniques.
The Reading Center and manufacturers recommend never mixing pastes to create a new product. Adverse reactions to mixing 2 electrolytes together cannot be predicted. Mixing electrolytes creates a product that is not FDA approved.
Assemble your supplies in advance. Have several pieces of cut gauze or pieces of tape ready to place on top of the electrode once it is placed on the skin. Gravity can move the electrode from its proper site while you fumble with equipment.
Place a small amount of electrolyte paste onto a clean disposable surface (i.e.: 4x4 gauze square, small plastic med. cup, or the back of your gloved non-dominant hand). If working in a hairy area, separate the hair in order to see the skin. Your site should still be visible from the prep phase.
If the participant is expected to sweat, there are additional skin preparations that reduce the moisture of the skin (such as PRE-TAC) and help improve the holding power of the adhesive. Try experimenting with such preparations. Generally, these liquids are applied very sparingly to prepped skin and allowed to dry before continuing with electrode application.
Before using tape, ask the subject about sensitivity to tape, latex or adhesives. Scanpor is a hypoallergenic tape. Micropor (paper) tape is another option, but is not preferred.
If using an application media that also serves as electrolyte (ie 10-20 or EC2) on the gauze square to anchor the electrode, it must also be the electrolyte used within the electrode cup.
When applying disk electrodes, work in a fashion so that the wires on the forehead and top of the head all point to the back of the head and down toward the neck, and the wires on the face and chin point upwards over the ears and then down toward the back of the neck. Use a small piece of tape or coban to hold the wires together at the back of the head, but allow enough slack so there is no pull when the subject moves.
Discard the unused electrolyte paste when finished. Never contaminate your original tube or bottle.
Techniques For Disk Electrode Application
Bare skin (Forehead): Using the gold disk as a scoop, fill the electrode cup with electrolyte paste so it is slightly rounded (there must be no “air pockets” which act to increase impedance). Place the electrode onto the prepped site, paste side down and cover with a piece of tape (Scanpor is preferred for facial skin). Press lightly on the top of the electrode as well as firmly around the rim of the cup to insure a good seal. Hold in place until electrolyte begins to set and feels secure. A larger second piece of tape may be placed over the electrode, if desired.
Scalp with hair: Separate hairs to make sure skin is visible. Using the above technique, fill the electrode cup with EC2 or Ten-20 cream and attach to prepped site. Cover the electrode with cut gauze pressing firmly on electrode and hold in place until the paste begins to set and feels secure.
Provide additional security for the head electrodes by using Head Net, which can be placed either like a stocking cap or in an “over the head and under the chin” fashion. Not all subjects will be tolerant of Head Net.
Thermistor AND Nasal Cannula
Place the correctly sized Dymedix sensor between the nose and the upper lip. Secure in place by looping the wires around ear and loosely cinching the slides near the back of the neck. Additional tape should be placed to hold the wires at the cheeks.
Place the nasal cannula so that the prongs are on the floor of the nares. If the subject is intolerant of the nasal cannula, the PSG may be performed without. A note of explanation must be provided on the SV form.
Oximeter
The finger oximeter records pulse and oxygen saturation using a small light that shines through the finger. Oximeter should be placed on the 3rd, 4th or 5th digit of the non-dominant hand (preferably the ring finger). Colored nail polish defeats the function of the oximeter, and must be removed from the finger prior to sensor attachment.
Directions for disposable probe: Grip the tabs on the sensor’s bottom adhesive cover and peel off the adhesive cover. Place the finger into the sensor nail-side up with the tip of the centerline mark in the curved area. Wrap the tape firmly around the finger. The fingernail should not be covered with tape during this step. Fold the sensor's top over the top of the finger and make sure the two sides are vertically aligned. Do not stretch the tape while applying the sensor. This may cause inaccurate readings or skin blister. Be sure that the emitting and receiving diodes directly “face” each other.
After securing oximeter sensor, ask the participant if any throbbing is felt. If so, reapply, loosening tape. Pass the oximeter cable over the surface of the hand, creating a circular “stress” loop, also securing with tape. Use several additional pieces of tape along the hand and arm, running the oximeter cable up the entire length of the arm to the shoulder, taping the connector to the shoulder. Check that the subject has free movement of the hand and arm.
Position Sensor
Before attaching the sensor to the subject its function must be verified. Check the sensor function by holding it in your hand and simulating movement to each direction. Wait long enough to see that the changes in the position channel on the computer are correct for the position. Then attach the position sensor to the Velcro chest extender or top of sleepwear making sure that the figure on the sensor matches that of the subject (head near the head, L to the left, R to the right). Apply tape as needed to further secure the position sensor.